Lunar photography can be very daunting at first. There are countless resources available online but you have no idea if it will work unless you try it out yourself.
Astrophotography is a fascinating thing and you never know what you might see the next time you capture something. The techniques and process involved are actually super easy- so I’ll be breaking that down for you in the next couple of paragraphs.

Whether you are using a pro camera or a budget smartphone, you should always try experimenting to see what it can do. Most of my friends are super-talented tech nerds- and if there’s one thing that being around them has taught me- it’s that you should never put off something because you think you don’t have the right gear. Work with what you want, explore the options, and be creative- and you will be surprised by how far you will progress even without the optimum gears required.
I do talk about some of the cameras you might want to look into for astrophotography after explaining my setup to get the best shots of the moon.
If you have always wanted to photograph the moon in vivid detail, this short article will take you from knowing barely anything to a wizard of lunar photography!
First things first- Camera & Lenses
I did say that you should always start on what you have- and this will help you stay motivated and excited when you actually get your dream gear. There are still some areas that you will struggle with if you don’t have the proper equipment, and that’s mainly because different types of shots require certain types of lenses.
I don’t want to discourage you- even if all you have is a cheap smartphone, you should always try your best to get well-composed shots. I do talk about my thoughts on using a cheap smartphone versus a professional DSLR in a separate post, but here, we won’t go into that.
So, even within lunar photography, there are many categories, and all of these require wide-field lenses. That’s because since the moon is pretty far from us, you’ll need a wider aperture and a much larger lens to allow for more light to pass in. More light means more details. When shooting distant objects, more is always better- at least when it comes to lens sizes.
There is also something else that you should be mindful of- if you just want to take pictures of the moon in a scene, you can go with a landscape-based wide-field camera but if you are planning to take shots of the moon along with some planet near it, you should go for a wide-field conjunction images.
When I was starting out, I used to think that capturing eclipses is pretty much the same as taking high-resolution shots of the moon- and I was pretty wrong.
One thing that I want to clarify before we go any further is that- you don’t need an expensive camera. Getting a quality lens (paired with a budget camera) is a great way to invest in your photography skills without spending a huge sum. If you’re just getting started, you probably don’t have that much to spend on photography gear- so keeping expenses small sounds great!
Lens Specs – Write this down!
If you have some experience in portrait photography, you already know that you are going to want wide lenses as they gather more light.
A focal length of about 10-50 mm is good for beginners to stick to. If you are thinking about high-resolution photography of the moon’s surface, you should be good if you get something that has a focal length above 200mm.
I would say the 200-400mm mark is a pretty standard one as far as focal lengths on astrophoto lenses go. If you have a bit to spare, considering telephoto and super-telephoto lenses is also a great idea but they are worth every penny. You will never want to go back to working with standard zoom lenses.
You cannot have a balanced composition with a narrow aperture- so keep an eye out for wide-angle lenses with not more than f/2.8 aperture.
Most reviewers don’t want to tell you that if you get cheap lenses for your camera, it’s only cheaper for that day. You will eventually pay for your poor choice in terms of image quality and focus-related problems.
I have had lots of experience with cheap lenses, so I can tell you exactly what to stay away from. If you do decide to get cheap lenses, you may find that crisp details on the lunar surface can seem splattered and unexpected colors at high contrast edges. You are getting exactly what you pay for so the camera lens isn’t where you should be considering saving money.
I also recommend getting a 2x teleconverter to enhance your reach but it will set your aperture width back by one or two stops. If you are on a budget, this is a fantastic idea to try out.
I’ve been experimenting with many aperture and focal length configurations, and I’ve found that you can get amazing results if you vary it a little. Just play around with the gear you have till you get a feel for what might suit a certain situation the best, and before you know it- you will have acquired an intuitive sense of lenses and apertures.
Getting ready for wide-field lunar photography
There are some things that you should keep in mind before you actually commit to telephotography.
Your camera needs to be mounted on a firm surface (preferably a quality tripod) and framed properly so you aren’t wasting any shots. I prefer taking shots of the moon when I’m out in the open at night- as I don’t need to deal with city lights and any distractions. If you’ve got friends, planning a campfire together is a great idea to try lunar photography.
You can also try asking your friends to join in and see what they come up with.
People are full of surprises, and you never know when you might learn something new about photography.

One of the perks of having quality lenses is that you get to shoot at really low ISO levels so you aren’t getting as high pixel noise as you would if you set the ISO to say, 800. We want to keep the ISO as low as we can, and that is around 100-400.
This is also the same for shooting videos in a studio- and while most cameras produce dim images at 100 ISO, you can get around that by putting in soft boxes. We cannot do that with the moon, so you cannot dial the ISO all the way down.
You should aim for crisp and focused images. I suggest working in manual mode- as it gives you maximum control over the camera setting. If your camera supports touch, which it probably does- you can also try tapping on the screen to ensure that the images aren’t out of focus. If you are new to exposure settings, I find setting the exposure at f/7 – f/9 a good idea.
One of the things that I have always struggled with when it comes to actually taking shots is that I’ve got shaky hands. Some people can effortlessly take smooth shots and there is no shaking at all, but when I do it- the images get shaky. The best way to solve this would be to use a remote cable release but you can also use the timer feature on your camera to automatically capture shots after a certain duration.
The perfect time to shoot the moon
There is actually such a thing as a magic moment to capture photographs of the moon’s surface. And that’s just before sunrise or after sunrise. During these two events can also give you interesting images, and if you are lucky enough to shoot the moon during an eclipse, all the better!
I can capture the best images of the lunar surface when there’s a foreground contrasted by a darkish disk of the moon in the background. Phases of the moon can also be interesting to consider for shots- and if you try experimenting, you will certainly end up with some pictures that you love.
Shooting on a night sky is always a great idea- and if the sky is clear and starry, great!
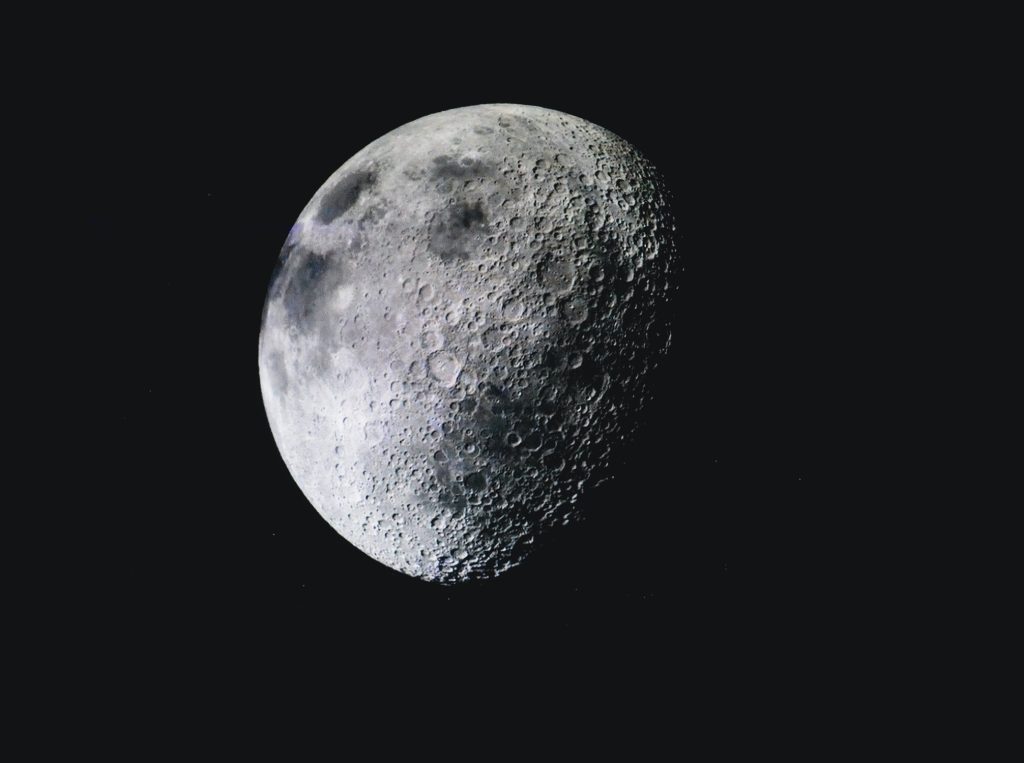
High-resolution lunar close-ups
It’s actually easier to shoot super crisp images of the moon than you might think- you just need quality wide-angle lenses and a stable tripod that can keep your camera secured in place.
Apart from the actual gear and technique you need to use, you should also keep in mind that the phases of the moon can actually affect how the lunar surface looks in the photos.
If you capture the moon when it’s crescent, you can get contrast in your images, as well as a more 3D-looking surface that has dark tones (valleys) and light areas where there are craters and hills.
The moon is super bright, so setting the ISO to roughly 100 helps prevent some of that pixel noise. There’s often a misconception that lenses produce the best images when fully open- but you will find that most lenses deliver exceptional images when they are not fully wide.
You can try an aperture of about f/7 – f/13 on exposures of 1/125- 1/500 for the best combinations.
I did say that you shouldn’t bump up the ISO as it will introduce more noise, but you should increase that if you feel like it’s not bright enough. During a lunar eclipse, the moon doesn’t reflect as much light, so it will appear dim. You want to increase your ISO levels just enough so that the moon is crisp.
Live view is a good option to take close-ups but you should always make sure that your subject is in focus before shooting.You can try zooming in on the surface and tapping to make sure that the moon’s surface isn’t out of focus.
You also shouldn’t choose long exposures as both the Earth and the moon are constantly moving.
Final Thoughts
Taking fantastic shots of the lunar surface can be very exciting, and the good news is- you don’t need a thousand-dollar setup to get started. You just need a budget camera paired with a decent wide-angle lens that can focus well on the surface of the moon.
When starting out, it’s more important to start out with what you have than leave it off thinking you’ll do it later when you have the right gear. I hope I have helped you in some way, and happy shooting!
Frequently Asked Questions
Can I Make Money Photographing The Surface Of The Moon?
It’s a tricky question to answer, partly because being paid in photography depends more on how you approach things than the amount of skill and creativity you have. If you put your pictures up on sites like Shutterstock or some site that allows visitors to pay a certain amount for permission to use your images, you can earn a couple of bucks.
Trying out on Fiverr is also a good idea but you will quickly find that there will be competition. If you really want to earn by taking pictures, you should focus on building connections and networking, and eventually, it will pay off.
What’s The Best Time To Photograph The Moon?
The best time to photograph the moon would be at twilight. You can try focusing on the moon at sunrise or sunset and see which one you like better.
The surface of the moon also looks different depending on the phases, and you may want to avoid the flat-looking moon during full moons.
Shooting the moon just before the full moon (while it’s still a crescent) is a good idea to get a sense of depth and dimensionality.